Welcome to the netINS Standard Web Hosting system.Support Information on netINS Business and Advanced Web Hosting can be found here. Using this system you can create new Email users under your domain (i.e. user@yourdomain.ext). This is an overview of how the Administration Interface works.
With activation of service you'll receive a packet of information regarding your account. Included in that is an Account Settings Document. The Account Settings Document includes the Administration Site URL (http://admin.yourdomain.ext) as well as your Admin Username and Password for entry into the Administration Site. Type your Administration Site URL (http://admin.yourdomain.ext) into your web browser's address bar. This will bring you to a screen similar to the one below. Enter your Admin Username and Password from the Account Settings Document.
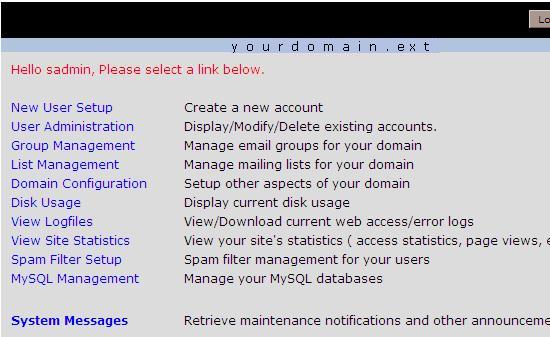
Correctly entering your Admin Username and Password will bring you to the Administrative Site Menu. Here you will be presented with eight options. A description of each option is listed directly to the right of each link. ^ Back to TopNew User Setup
In the New User Setup screen there are Required and Non-Required fields. The Required fields include:
The Non-Required fields include:
If you make a mistake and would like to clear all of the entries you've added, you can click on Reset. After adding all of the appropriate entries, click Create!
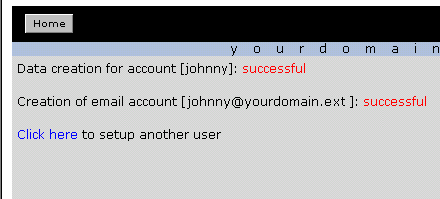
After clicking Create you will be shown the results of the operation. It should show successful creation of both the account and email account. You are also given the option to create another user. If you are finished adding users, click the Home button on the top left corner of the web page.
To setup an email client to use the new mail hosting account visit the Email Client Setup Guide. ^ Back to TopUser Administration
The User Administration section of the site provides you with the tools to view the different attributes assigned to each user.
By searching for "johnny" we should be able to view the account we set up.
If you have a need to view all of your users, or users with similar attributes, you can use the "wild-card" tool. A search for the * (asterisk) character provides a listing of all users.
The results from our "wild-card" search shows a different row for each user.
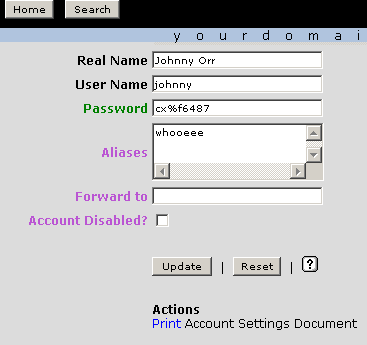
From this screen we can either Edit or Remove users from the system. Users that have their usernames listed in red are disabled. Reasons for disabling an account may vary but it is a tool you can use if you want to prevent a user from using their email account. Disabled users will still be included in billing. If you want to stop being billed for a user you must delete the account. Let's click Edit on the "johnny" account. As you can see the user's attributes are shown but not editable. In order to edit the user's properties, the account must be active. Unchecking the Account Disabled check-box and clicking the Update button will reactivate the user.
This screenshot shows the account after it has been re-enabled.
Note: From this screen you can print an Account Settings Document that you can use to setup your new (or edited) user. ^ Back to TopDomain Configuration
Currently this section serves one purpose: how to handle email sent to unknown addresses. If someone on the Internet attempts to send an email to a user at your domain that you have not created, this section will detail what happens to that email. There are four options:
If you choose to use the Rerouted to option, you need to specify an email address to send it to. Often companies send these types of messages to the office manager.
Disk Usage
The Disk Usage section calculates how much hard drive space your website is using. For Standard Web Hosting customers, your disk usage is divided into two sections, Per-Account Mailbox Utilization and Website Utilization. The Per-Account Mailbox Utilization section will show you how much disk space each user is using. Each user on the system is eligible to use up to 10MB of space. Typically users download all their email to their computer, and remove it from the server. Most users who regularly check and download their mail never run into a disk quota issue. However, users also have the option to leave their email on the server so that they can view it from multiple computers. If this is the case, that user will want to keep a close eye on Disk Usage. As soon as that user's email spool reaches 10MB, the server will no longer accept messages for them. They will have to download or delete the messages in order to receive more mail. The Website Utilization section will display the amount of memory used by your website, the amount remaining, as well as the percentage of space you have used. This total is separate from the totals of the Mail accounts. Click on Disk Usage; a warning message will appear. Click OK.
Once the calculations are complete you will be shown an output screen similar to the one shown below. Any users approaching 80% should be warned.
View Logfiles This tool is intended for customers that have an netINS Web Hosting account. If you are using the Administration Interface strictly for Email this tool will not provide you with any valuable information. If you use the netINS Standard Webhosting Service,
click on View Logfiles.
From the View Logfiles section you can select how many lines of the most current log entries you'd like to view and which log you would like to view.
View Site Statistics
Click on View Site Statistics. A new
browser window will open with a web page dedicated to your site's
traffic statistics. Detailed instructions are listed on the stats site. Group Management Click on the Group Management link.
This will open the Group Management interface for your domain. Groups can be useful for small groups of people in your organization that work closely together. An example might be your sales department. You can set up a "group" for sales. Anytime an email is sent to sales@yourdomain.ext it would be distributed to all of the users you specify for the group.
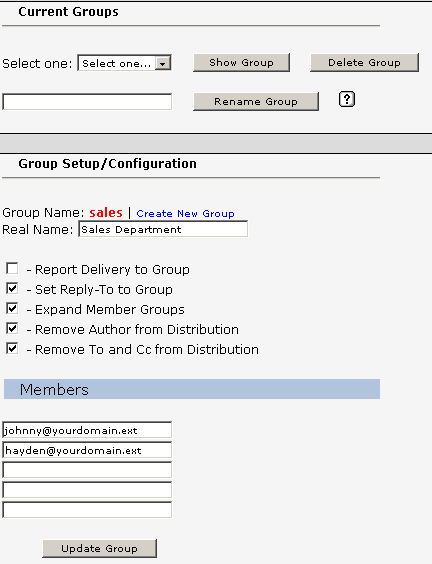
To create a new group enter the group name (this will be the email address for your group) and give it a Real Name which would better describe the group you are setting up. Place checks next to the options you would like to enable for each group. The only thing left to do is to add the members of the group. Don't worry, you can add more than 3 per group. As you add more and more members, additional entry boxes will appear after creating the group.
Once you've added the group you can use the Current Groups section to make any necessary changes. Explanations of the configuration options are provided below this image.
If this option is selected, then a delivery report (if requested) is generated as soon as a message is copied and re-submitted for delivery to all group members. If subsequent delivery to any group member fails, error reports are not generated. If this option is not selected, delivery to this group is processed as relaying, and the delivery notification options are copied to addresses of all group members. If delivery to any group member fails, the sender gets an error message. If a message was sent with delivery notification requested, the sender will get notification delivery from all group members.
If this option is selected, the Reply-to: header pointing to the group address is added to the message copy before it is sent to group members. This ensures that replies to a message sent to this group will go back to the group, not to the message author.
If this option is selected, the group members are checked before a message is copied and sent to member addresses. If a group member is a group in the same domain, then that group's members are extracted and inserted into the address list. If that group also has this option enabled, the extracted members are checked, too. This option allows more efficient group delivery (only one message copy is created for all recipients) and it also helps to avoid duplicates and mail loops. If the group contains two other groups (sub-groups) as members, and those sub-groups contain the same address, then only one copy of the message is delivered to that address if the Expand option is enabled. If this option is disabled, the copy of the original message will be delivered to both sub-groups, and each sub-group will send its copy of the original message to that address.
If this option is selected, the message From: address is removed from the (optionally expanded) members list.
If this option is selected, all addresses from the message To and Cc fields are removed from the (optionally expanded) members list. The sender address is always removed from the members list so the message sender does not get back his/her own messages. A working knowledge of relational databases is required to use these features The MySQL® database has become the world's most popular open source database because of its consistent fast performance, high reliability and ease of use. It's used in more than 11 million installations ranging from large corporations to specialized embedded applications on every continent in the world. (Yes, even Antarctica!)
Click on the MySQL Management link.
From here you can create or delete MySQL databases
If you try to add more than 2 databases you will be warned that additional databases will result in a charge
Additional settings can be accessed using the PHPMyAdmin found here Click on the System Messages link.
Stored here are important messages about system maintenance and other announcements. If we need to contact you, or inform you of regular system maintenance, we will do it here. |
|
All text and original graphics copyright ©1993-2017 MMCTSU All Rights Reserved. |


